
Logging into Simple Syllabus
Log into Simple Syllabus using your institutional credentials or Simple Syllabus credentials.
Template Editing Process
From the template browser in the Course Outline Portal, scroll to the faculty you are looking to edit and click the “edit” button to the right of your chosen faculty. If you are editing a specific department’s template, click on the arrow to the left of the department’s governing faculty, scroll down to the appropriate department, and then click the “Edit” button to the right of your chosen department.

Within the template editor, you have access to a variety of options for making changes. To start, scroll through the pre-built template to see what comes with the base model. Consider what changes you will need to make for your faculty/department.
At the top of each component of the template, you have three sliders: optional/required, invisible/visible, and private/public. Any of those that are greyed out and feature a lock next to them cannot be toggled as they have been set that way at a higher level of the organization. You are free to set anything that is not locked as you see fit for your template.
- Optional/required sets whether a particular component must be a part of each syllabus using the template.
- Invisible/visible sets whether viewers will be able to see a particular component.
- Private/public sets who can view that component (private = only the instructor and students enrolled in the class, public = anyone with access to the syllabus library).

***NOTE: If you leave a component visible and public but blank, it will not show up in the published template.
Each component comes with a title and some general formatting. You can change the formatting and text with the interface above each textbox. Most options are common to those found in Word, Google Docs, etc., but below are a couple of unique options:
- The cube icon allows you to “add block” into the component. Blocks are placeholders where data from the portal will automatically be inserted upon the creation of a syllabus. Blocks can cover things like instructor name(s), term start and end dates, and anything you might want to auto-populate for creating syllabi from the same template across years.

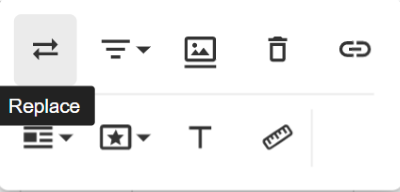
- If you have a particular image or video you want to be included in a component, you can add that with their respective icons in the interface. Once you have added one, changing it just requires you to click on the picture/video and select “replace”.
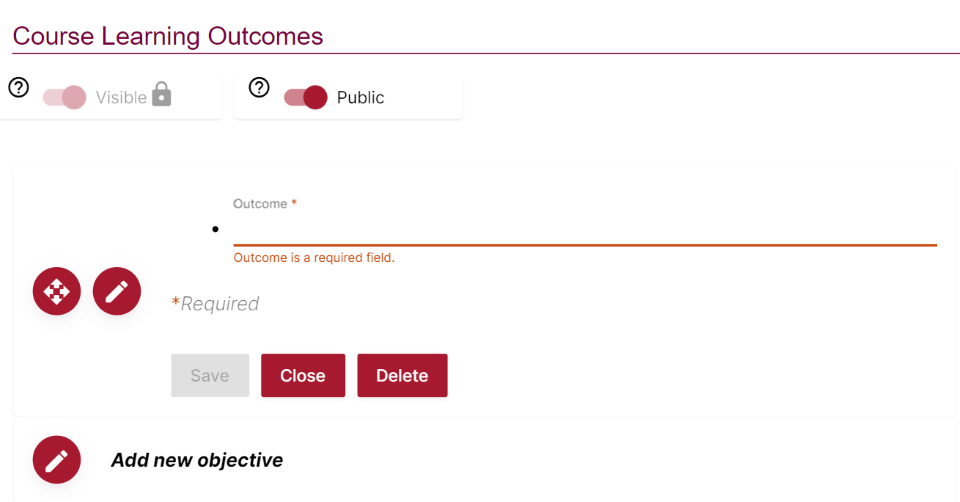
Some components are by default empty aside from an “Add new objective” or “Add new material” pencil button. In those components, you can click on the button to add any information you want to be present on all syllabi using your template.
- For the “Add new objective” components, clicking on the pencil button will produce a small textbox for a single objective.
- If you want to add multiple objectives, save your first one and then click the pencil button again to add more.
- If you want to rearrange the order of your objectives, you can do that with the button that has four arrows on it (to the left of the pencil icon).
- If you want to delete an objective, click the pencil button and then Delete.
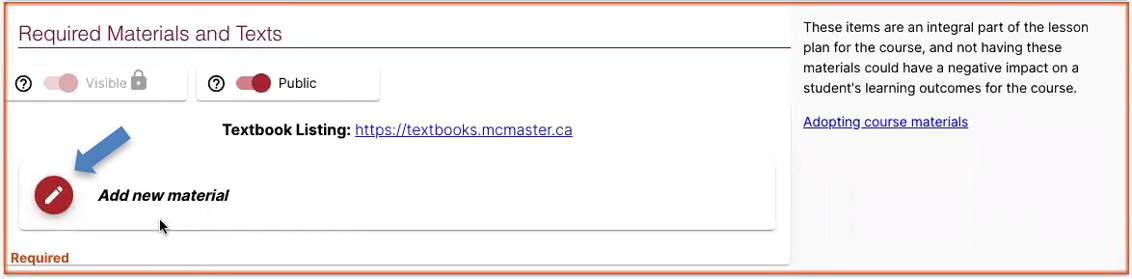
- For the “Add new material” components, click on the pencil icon to open a book search option. You can manually enter information for the book(s) or search for it in the bar at the top. If the search bar finds your book, it will auto-populate the information into the template.
Given that both the learning objectives and materials are more likely to be course-specific rather than department- or faculty-specific, I don’t anticipate this coming up often when editing templates, but it felt worth including just in case.
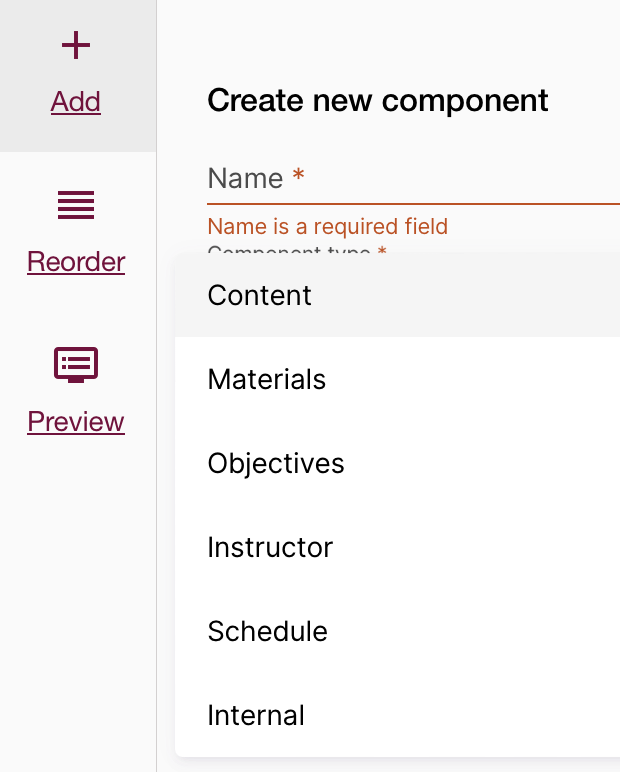
Add New Component
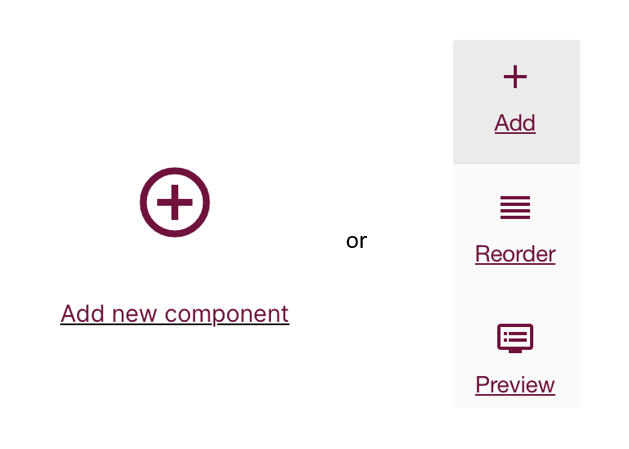
After finishing with the rest of the template, if you find you need additional components, you can click on the “Add new component” button found both at the bottom of the template and at the top along the left-hand side.
After clicking on the button, a new menu will pop up asking you to name the new component and to determine its type. There are six types:
- Content: This is your standard component for writing out course details, including pictures/videos/tables, and things like that.
- Materials: This is for adding additional course material components.
- Objectives: This is for adding additional course or program objectives.
- Instructor: This is for adding additional instructors, TAs, etc.
- Schedule: This is for building a schedule for the class using textboxes, tables, etc., in the syllabus.
- Internal: This is for including information that you want your instructors to read but you don’t want in the final published version.
You can further edit new components by clicking the red bar to the right of each component.

***NOTE: While you can technically click this for any component, including those you have already filled in, it will appear behind anything you have put into a component, even just a blank text box. I recommend using this only when creating a new component.
Within that menu, you will see several options for changing how the component appears. Although the full list is dependent on the type of component you are editing, some of the common ones include:
- Add conditional content: you can set up specific conditions to determine whether a certain component appears within a given syllabus (e.g., you can set the component to only appear on a syllabus if the course is within the English department).
- Delete component: deletes the component.
- Lock: You can lock the component so that no syllabus using your template can change it.
- Ignore Previous Content: if someone using this template is likely to import content from a previous syllabus, you can set this component not to take imported content.
- Editors: you can set who has editing permissions for a given component.
- Help text: you can edit and rewrite the help text (i.e., what you see when you go into the red bar menu) for a given component.

Reorder The Components
Another option for changing up your template is to reorder your components. At the top of your template, you’ll see a “Reorder” button on the left. Clicking on that will bring up a menu with all your components listed. You can then either drag and drop components in the order you want them or use the arrow buttons next to each component to move them up and down.
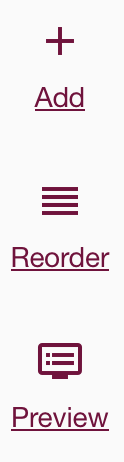
Preview Template
As a final note, you have the option to preview your template with the “Preview” button. Although you can do this with a blank template, note that the preview will only populate the sections where you’ve included content. Preview is a better option once you have put together an actual syllabus. However, if you want to see what your template would look like, you can fill your components with whatever, click preview, and then delete what you just typed in before submitting the final template.