

This is the full selection of tools you have available to you when writing something in a section of your outline. Most of these may be familiar from other text interfaces, but we will walk you through what each button does.

These are the basic options you can use to change the font style for your post. We will go through them now, left to right:
- Bold: make your text bold
- Italics: italicize your text
- Underline: underline your text
- Subscript: type in subscript, i.e. type just below the current line
- Superscript: type in superscript, i.e. type just above the current line
- Font family: choose the type of font you want to use
- Size: change the size of your font
- Text colour: change the colour of your text
- Background colour: change the background of your current line (think the “highlight” function in Word)

These are the options you can use to change how your paragraphs and lists are formatted. They can adjust spacing, sizing, alignment, and other elements of your text. Left to right:
- Paragraph format: the portal’s text editor offers four options for paragraph style depending on your needs. Each one will alter the spacing between the lines and may also change your font style
- Alignment: aligns your text to the orientation you want. Like with Word, this editor offers four options, including left aligned, centred, right aligned, and justified
- Ordered lists: allows you to create an ordered list, using numbers, letters, roman numerals, and greek characters
- Unordered lists: allows you to create a list without a specific order using circles, discs, and squares
- Decrease/Increase indent: Adjusts how far a specific paragraph is indented
- Quotation: allows for the inclusion (and removal) of block quotes

These are the options for inserting links, media, and tables into your text. The portal is fairly robust in allowing you to include non-text options in your outlines, and these are some of the ways to do that. Left to right:
- Insert link: clicking on “Insert link” opens a popup for you to type in the link you want to include. You can type the link in the “URL” field and then use the “Text” field to decide how you want the link to appear in your outline. There is a checkbox if you want the link to open in a new tab. Finally, in the top left corner of the box, there is a magnifying glass button you can click to autopopulate one of three already included links (Google, Froala, and Facebook)
- Insert picture: clicking on “Insert picture” opens a popup for choosing your picture. There are two options for inserting a picture into your outline, each with its own tab at the top of the popup. You can upload the picture either by dropping it into the popup or choosing it from your file browser. Or you can link to a picture on a website by including the picture’s URL in the “URL” field
- Insert video: clicking on “Insert video” opens a popup for choosing your video. You have a few options for inserting a video into your outline, each with its own tab at the top of the popup. The first option is to paste a URL for the video into the “URL” field. If you use this option, you can also choose whether to set the video to autoplay once accessed. You can also embed a video in your outline by pasting the embedded code in that field. Finally, you can upload a video by either dropping it into the popup or finding it in your file browser.
- Insert table: you can create tables in your outline using the table tool. Note that tables are generally not recommended for accessibility reasons. If you need to use one, please follow the instructions found here to ensure that it is as accessible as possible. Click on the table tool button to start drawing your table. Once you have set the number of columns and rows, you can click within the table to change additional settings, such as adjusting the size, changing the background, and setting alignment
- Emoticons: you can include emoticons in your outline by clicking on the smiley face and browsing the popup for the one(s) that suit your needs
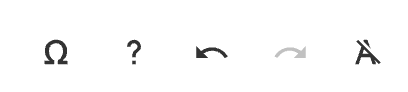
These options allow you to add special characters, get help, and make overall changes to the things you have done within the text editor. Left to right:
- Special characters: the omega lets you insert special characters, including mathematical symbols, letters of the Greek and Cyrillic alphabets, currencies, and alternative punctuations
- Help: the question mark brings up a help screen which includes a list of shortcuts you can use to make your typing easier
- Undo/Redo: the arrows allow you to undo and redo your most recent actions in the text editor
- Clear formatting: the A with a slash through it clears all formatting you have set in the text editor, leaving you with unformatted text and media

This is the add block button. Blocks are sets of data used to autopopulate certain information into your outline. They look for information stored in the system about your course and will automatically include it in a block added to your outline. Things like the instructor name, the course code, and the term start and end dates are all things that can be included in your outline via blocks. However, know that only certain kinds of information are stored in the system. Some blocks, when added, will remain empty, if there is nothing in the system with which to populate it. If you add a block and decide you do not want it or find that it is empty, simply click on it and then click on the trash can icon that appears to delete it.